
This stands far and above all other projects I’ve assisted. My role here was so minimal, it is laughable to claim any ownership or credit for the result. What cannot be understated is that I WAS IN THE ROOM when these guys laid this down. It was before lunchtime on a grey Seattle morning at Studio Litho, 2nd take of the day. These guys recorded these songs live – meaning they all play at the same time, recording it all in one take. While I stood rubbing my eyes, trying to graduate from my morning coffee to monitoring mostly mounted cameras, I had my mind blown. To this day, my mind is still blown every time I watch. Enjoy!
Getting vertical
The way you deal with vertical elements in real estate photography is as critical as the way you deal with light and color.
Vertical lines
Vertical lines are the foundation of your composition in most real estate shots. Specifically, vertical lines need to be as straight as possible. This is easier said than done, especially when you are shooting with an ultra-wide angle lens. If you are reading this, you’ve likely already begun shooting everything with the camera level (as opposed to tilting up or down, causing all verticals to appear at an angle). While it may be necessary in extreme situations to tilt the camera, it is generally something to avoid. As you may have experienced even with the camera straight, you are bound to end up with lines that aren’t exactly vertical in your composition.
Vertical lines exist in archways, doors, windows, cabinets, picture frames, lamps, fireplaces, etc. and your best bet is to keep the camera a good distance away from them. When this is not possible, use software to correct for lens distortion and/or crop away from troublesome vertical lines. As you begin to obsess over your vertical lines, you will start to notice many things. Like the fact that most refrigerators lean back at an angle. When appropriate, edit some of this stuff, but keep in mind how much time you are spending in your post processing. I am a firm believer in the law of diminishing returns as it pertains to photo editing.
Vertical positioning
There are many factors that determine how high to position the camera when shooting a room. Given that we are using an ultra wide angle lens, there is inevitably going to be a lot of ceiling in our photos. Because of this, people have a tendency to want to keep the camera lower, which reduces the amount of ceiling and increases the amount of floor seen in the composition. In an empty room with a low ceiling, it is absolutely a good idea to lower your tripod closer to the floor. When the room has stuff in it, everything to do with vertical positioning gets complicated and you will have to raise back up to chest level, sometimes higher. Shooting too low in a room full of objects creates a 2-dimensional image with almost no depth.
Counters are usually strong design elements in kitchens and bathrooms. To be able to see countertops and sinks, you need to position your camera above them. Showing the counter surface provides essential detail and depth to the photo. Of course, raising the camera above the counter level comes with some drawbacks. The first problem is that you are showing more ceiling and less floor. This is a necessary evil – just make sure you don’t go up too high. In small rooms, it may be impossible to show the floor and the counter top.
Another pitfall of raising the camera is the increased severity of shadows below the edges of counters and tables, primarily from any flash you might be using. Simply be aware of these choices and use your best judgment. When appropriate, shoot difficult shots from different heights and then you can decide later which makes sense, based on the rest of the photos you may have of that room.
Given all the ups and downs in every real estate shoot, try not to obsess over the setup of any one shot for more than a minute or two. The last thing you want to do is spend a bunch of time shooting and editing a difficult photo that will never end up being used for anything. When you just can’t seem to find the right vertical position for a shot, you are probably standing in the wrong place. Try moving a foot or two and re-assess the angles.
Above all, I try to avoid being asked later for “a different angle” that I didn’t capture.
Keeping everything in focus
When someone asks me what the main difference is between shooting portraits and shooting real estate, the first thing that comes to mind is depth of field. Photos of brides and infants tend to have large areas of the frame that are artistically out of focus. In my opinion, everything should be in focus in a good real estate photo. To keep everything in focus, you will need to pay particular attention to your aperture and your focus distance.
Aperture
Your aperture, or F-stop setting, controls how wide open the lens is. A low F-stop such as F/2.8 (large aperture) is wide open, gathers light very quickly, and provides crisp focus on a small depth of field. Much of the composition will be out of focus in low aperture, and the shutter will be relatively fast. F/2.8 may be great for portraits but it won’t provide the best results for shooting real estate.
To ensure that an entire room is in focus, I always use F/8 or higher. With large F-stop selected (small aperture) the lens opening is relatively small, gathers light slowly, and therefore takes much longer to form a composition. Any of you still trying to shoot in “Auto” mode will need to switch to either Manual or Aperture mode to achieve desired, high aperture settings indoors. Typically when we are indoors, it is a low-light situation. Auto mode on most SLR cameras will insist on F/5.6 or lower in low light, unless you override it. As you force the aperture smaller (large F-stop), it is crucial that you use a tripod, since your shutter will often be slower than 1/40 of a second. Most people can’t hold a camera still at these settings, especially after numerous caffeinated beverages.
Focus distance
If you are good at it, use manual focus. And don’t forget to keep an eye on your focal distance on every shot. As the size of the room you are shooting changes, you will need to adjust your focal distance. Moving from exterior to interior will require a vastly different focal distance as well.
For most of us using auto focus, you simply need to pay close attention to where the camera is focusing. Make sure that the camera is not focusing on unimportant things in your foreground (e.g. bushes, counter-tops, furniture) as this will increase the likelihood of important stuff further back in the scene being out of focus, even at high aperture settings. If necessary, force the camera to focus on something at the correct depth by pointing it directly at the subject, and then return the camera to desired location and finish the shot.
When it is apparent that something in the foreground (or far away background) could distract the auto-focus function of your camera, I always take multiple photos. Use your ears to determine if the auto-focus is working to find a focal point between shots and take 3 or 4. One of them is bound to turn out right.
The ups and downs of modern real estate photography
Upside:
1) Modern cameras make it possible to take good photos of houses, quickly, in reasonable conditions. Combined with a good flash and tripod, today’s cameras can produce great results in short order.
2) Real estate listing photos are mostly viewed online, often on a phone or tablet, so the files should not be enormous. This makes things a lot less cumbersome for anyone dealing with the photos. Photographers, realtors, homeowners and prospective buyers all benefit from photo sizes that are easy to distribute and view quickly. This far outweighs the rare instance where somebody wants to print a poster-sized photo of a living room.
3) Homes do not move, allowing you time to find the right angles and adjust the things you can control (blinds, furniture, lighting).
4) If things really go poorly, you can always come back – your subject isn’t going anywhere! It can be very awkward and inconvenient for the homeowners/realtor, but getting the shots right will always outweigh your convenience. It hasn’t happened in awhile, but the times I’ve had to return when something has gone wrong have usually been met with understanding and even humor. You tuck your tail and admit you didn’t get it right the first time and set forth to get it right.
Downside:
1) Most home listings don’t justify a large budget for photography. You’re going to have to get over yourself and accept that many captures of many rooms in many homes will not be worthy of consideration for any artistic awards. If someone should commission you to take THE photo of their view property at dawn for the purposes of acquiring large prints, then you should get serious. Especially when it comes to insignificant rooms that may be small, awkward or cluttered, it is important to recognize when your photo is “good enough” so you can concentrate your time on the best shots available. I’m a firm believer in documenting everything to cover my tracks in the event of a customer saying something like, “I didn’t find any photos of my pocket laundry room.” I take photos of EVERYTHING, just in case, but I sure don’t spend as much time on the little things. Those shots are more like an insurance plan.
2) You need to work relatively quickly through constant change (interior, exterior, rooms with bay-window views, basements). Just when you get your settings dialed for the kitchen full of windows, it’s time to shoot the dark green bathroom. Never lose track of where ALL your settings are. You don’t want to be finishing up outside and realize your white balance and ISO are still set for the basement.
3) The shooting environment will include many things beyond your control (sun, weather, non-working lights). From power being shut off in a bank-owned home to wicked sunlight in a room with no blinds, you will run into many irritations that you must simply accept and conquer. On that note, it is a good idea to always travel with a pack of light bulbs.
Aerial photography an aerial kick in the pants
I’ve always been an R/C guy as far back as I can remember. My first remote control car was corded and the remote had 2 buttons: one would make the car go forward and the other would simultaneously reverse and turn to the right. The cord between the car and the remote was about 2 feet long so I had to hobble and crawl around to follow the car as I drove it. I thought it was amazing and like many other toys before and after, it was my favorite toy until it stopped working properly.
The R/C world will never be the same now that the consumer drones of 2014 have arrived. Quick and fast, camera’d up with first person view, long range and healthy battery life equals a flying camera. The company that manufactures mine even calls it The Flying Camera right on the box. I call it my 200 foot tripod.
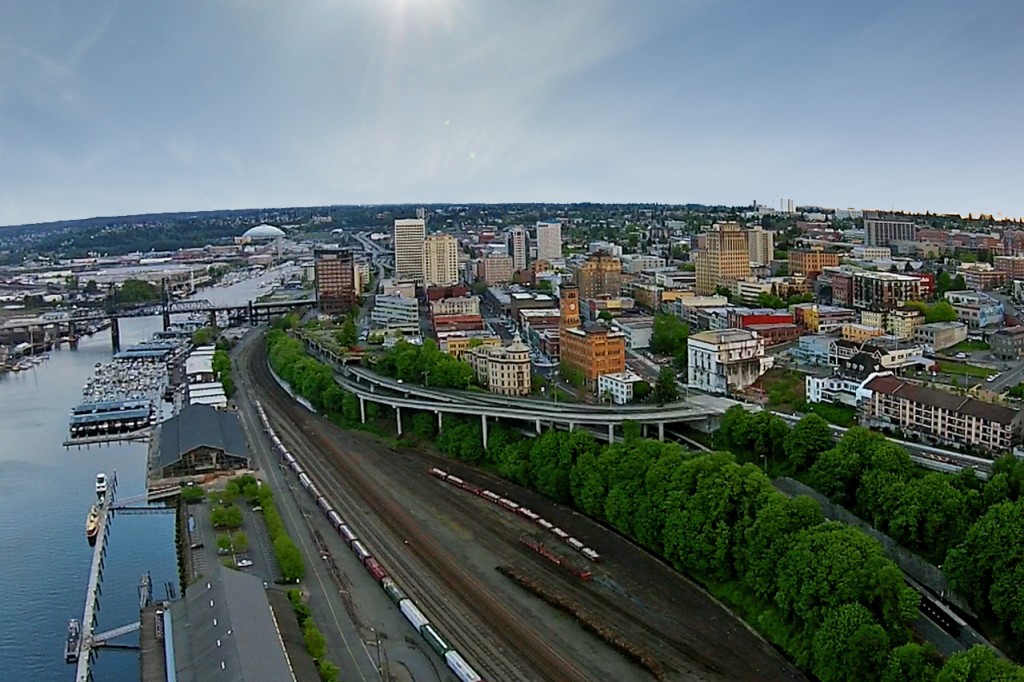
Having taken an awful lot of photos in Tacoma over the years, I often run out of ideas for intriguing, local subjects without being somewhat redundant. As a real estate and landscape photographer, my domain has expanded exponentially since implementing a quadcopter. The creative concepts made possible by drones will be invaluable to freelance photographers and videographers if the FAA doesn’t ground us all in September 2015 (date set by Congress by which the FAA must draft regulations on private and commercial drone use).
Until the laws change, you can expect to find me taking aerial photos and video all over Tacoma any time the weather is nice and I have a free hour to fly. For those of you interested in seeing it up close and personal, I now include demonstrations of modern quadcopter operation with my real estate photography MLS listing package. Contact me here to schedule a photo shoot.
The Crater
When I was a child, our elementary school librarian read books to us in a recessed area of the library floor called The Crater. Terraced seating extended along the outside of the semi-circle in 3 rows. Entire classes of children huddled together as Mrs. Thrasher read to us with enthusiasm that brought us inside the world of the storybook. She carefully rationed photos and illustrations to avid onlookers but you always knew the words of the story were most important to her. The pictures were always the draw for me. This weblog is dedicated to Mrs. Thrasher, who passed away in early 2014.